Building the engine
Hello there again!
I’ve made it to the 2nd post and it’s quite good. Hope I’ll make it to the 3rd one :)
Today’s topic will be the project infrastructure and the build process. It’s worth noting that I’m almost completely new to the subject, so this post doesn’t claim to be pure learning material. Forward!
Background
Obviously, like a “true” game programmer I develop my engine in pure C++. Cool thing about this language is that it’s not only really hard to write code in it, but it’s also quite a challenge to run this code on your machine. So the biggest problem along first week of development wasn’t really engine code itself but the infrastructure around it and fights with build systems and IDE’s.
There are plenty of different IDE’s, compilers, toolchains and infrastructure to build C++ code for your machine. At the university I was mostly working with Clion. Good thing about Clion is that it is multiplatform and it not from Microsoft. The problem was is that at university like 95% of the projects was some single file TaskName.cpp that we sent to grading system and got the points. We didn’t really bother with questions “how to build bigger stuff with it?”
How to run C++ code
I think it would be nice to fixate how to run a bunch of C++ code at all.
Basically you need to do 2 things: compilation and linkage. There are compiler and linker programs for that purposes. The compiler reads C++ code as text and, after many complex ass transformations, creates object files that contain machine code. Anyway, the generated code, despite being called a machine, cannot be executed on your machine because it has not yet been linked. Linkage is the process where the linker looks at a bunch of compiled object files and tries to resolve all dependencies in them and makes an executable file in a format the operating system does understand. And voila, you have shiny Application.exe icon that you can double click and it will do some stuff that you’ve wrote.
It all sounds interesting and funny untill you will try to run something bigger than HelloWorld. If you are using just a command line then you will quickly notice that you need to repeat compile command for each .cpp file in your application and then call linker on all of generated object files. It will rapidly become a mess. Here is simple linux example:
g++ -c main.cpp
g++ -c MathModule.cpp
g++ -c GraphicsModule.cpp
g++ main.o MathModule.o GraphicsModule.o -o MyCoolApplication
Comments
# g++ => calls GCC c++ compiler program;
# -c => tells compiler not to link object files right away;
# <name>.cpp => C++ source code file name
# <name>.o => generated object files;
# -o => tells compiler that you want to rename output exe file
Here first 3 commands compiles 3 C++ files ( main.cpp MathModule.cpp GraphicsModule.cpp ) and fourth one links it all together into MyCoolApplication execution file. Now imagine if you have like a 100 code files in your application and call an ambulance. But not for you! Makefiles are here to help.
Of course programmers are too lazy to do this stuff by hand, so they made a tool that will make all this commands for them and called it, drumroll, Make. With Make you can write a single Makefile for your whole application and then call something like “make run” and it will actually do everything for you. But of course there is a problem. Makefile. Syntax of which, well.. Here is a snippet from my C++ programming course semestral work:
# Creates the dependecy rules
%.d: $(SRCDIR)/%$(EXT)
	@$(CPP) $(CFLAGS) $< -MM -MT $(@:%.d=$(OBJDIR)/%.o) >$@


# Building rule for .o files and its .c/.cpp in combination with all .h
$(OBJDIR)/%.o: $(SRCDIR)/%$(EXT)
	$(CC) $(CXXFLAGS) -o $@ -c $<
Like come on, is it even supposed to be written or read by humans?! It looks like some guy was editing text file, then sat down on keyboard and got this. Wtf is $@? What is the difference between $@ and $< ? I wrote it only a year ago and now i need to google literally each symbol to understand what is going on here. It’s just awfull, never use it, ever.
And of course programmers were again to lazy to do this stuff by hand, so they made another tool that, drumroll, will now make Makefiles for them and called it CMake. Now you can write CmakeLists.txt file that describes how Makefile will be generated, then call CMake and have your shiny cool Makefile that knows how to compile and link your code. Fascinating.
CMake works with what is called targets. I understand it as something you can construct from your code. It can be executable file that can run and calculate things or it can be library that can be connected to other applications which runs and calculates things.
By the way CMake syntax makes much, much more sense. Here is a simple example of CMakeLists.txt file:
cmake_minimum_required(VERSION 3.23) #1
set(CMAKE_CXX_STANDART 14 ) #2
project( MyCoolApplication ) #3
add_executable ( MyCoolApplication main.cpp GraphicsModule.cpp MathModule.cpp ) #4
- Tells which version of Cmake to use
- Tells which version of C++ to use
- Tells name of the project
- “I need an executable file from main.cpp GraphicsModule.cpp MathModule.cpp C++ source files”
In fact modern C++ stuff usually being builded using CMake tool.
Microsoft Visual Studio vs not Microsoft Visual Studio
Unfortunately, I didn’t really had experience building more or less big application using Cmake. Unreal Engine uses it’s own build system that actually does everything for you. For C++ programming course we were writing dumbass MakeFiles by hand which is not really usefull. Last thing is graphics programming course. The problems is that we were using Microsoft Visual Studio toolchain for it and I didn’t really liked it.
As far as I know Visual Studio don’t work with CMake by default. It has it’s own build system called MSBuild and… I believe you can actually configure it to be portable to different platforms… You can even write a CMake files and it will understand it and… Meeeeh, this project are being made for fun and study! If I want to learn how CMake works then I will learn how Cmake works. So I’ve started development in JetBrains Clion using pure CMake build toolchain.
Laniakea CMake build
When you are creating a new project, CLion prepares a simple CMakeLists.txt file for you that contains an executable target. When you add a new .cpp file, it gives you a choice of which targets you want to add this file. Also, you can configure different build configurations by providing new targets in CMakeLists.txt files and adding different profiles for Debug/Test/Release builds.
I’ve made a simple CMake file that runs the engine. But quickly I realized that I don’t really want to run the engine. I would like to use the engine as a library for an application that is built using the engine. And that’s the moment when things started being tricky.
So I created a new SampleProject that will be runnable and used to build some simple game that uses the engine from it later. This SampleProject depends on the engine library and links against it. In practice, it looks like that:
# Root CMakeLists.txt

cmake_minimum_required(VERSION 3.23)
project( Laniakea )

add_subdirectory( Laniakea )
add_subdirectory( SampleProject )
There is a root CMakeLists.txt file that includes both projects. Laniakea Engine will be built as a library and SampleProject that uses the Laniakea library to build an executable game.
# Laniakea Engine CmakeLists.txt

add_library(LaniakeaEngine SHARED ${LANIAKEA_SOURCE_APPLICATION})
target_link_libraries (LaniakeaEngine glfw3 opengl32)
Laniakea Engine is built as a library. Here, add_library tells CMake that we want a new shared library target from source files that are written to LANIAKEA_SOURCE_APPLICATION variable. target_links_libraries() command tells CMake that we want to link the engine library against some other 3rd party libraries (glfw3 for windows, inputs, and other system stuff and OpenGL for graphics for now)
And here is SampleProject Cmake file:
add_executable( SampleProject ${SAMPLE_PROJECT_SOURCE} )
target_link_libraries ( SampleProject ${SAMPLE_PROJECT_BUILD_DIR}/libLaniakeaEngine.dll )
Unlike the engine, here we are telling CMake that we want a runnable execution file from source files defined in SAMPLE_PROJECT_SOURCE variable and then we are linking it against the engine library that is placed in the directory that is written to SAMPLE_PROJECT_BUILD_DIR variable.
Uff, core stuff is behind. Only a few details remain.
So the next thing that I made was debug/release build configuration differences. For example, I wanted to turn any debug metadata off in the release build and turn the optimization level to the maximum to gain performance. Here is how it was done:
# -------- Release/Debug compiler flags --------
set(COMPILER_RELEASE_FLAGS -O2)
set(COMPILER_DEBUG_FLAGS -g -Wall -Wextra -pedantic)
if (CMAKE_BUILD_TYPE MATCHES Debug)
    set (COMPILER_FLAGS ${COMPILER_DEBUG_FLAGS})
endif()
if ( CMAKE_BUILD_TYPE MATCHES Release)
    set (COMPILER_FLAGS ${COMPILER_RELEASE_FLAGS})
endif()
add_compile_options ( ${COMPILER_FLAGS} )
Here I check if it’s debug or release mode and depending on that I set different compiler flags.
In release mode, I am just using -O2 => optimization level 2. And in Debug mode -g => tells the compiler to add debug metadata into compiled code. -WAll => show all warnings; -WExtra => show extra warnings; -pedantic => show extra extra warnings.
I believe CLion sets CMAKE_BUILD_TYPE variable depending on a profile that you configured. Then I just check whether it’s Debug or Release build type and then set the correct compiler flags using add_compile_options(). Easy-peasy.
Also, I am changing the output directory for the engine library in CMake. If it’s in debug mode I am putting it into SampleProject/Build/Debug folder and if in release in SampleProject/Build/Release folder.
# -------- Release/Debug binary directory --------
if ( CMAKE_BUILD_TYPE MATCHES Debug )
    set ( CMAKE_RUNTIME_OUTPUT_DIRECTORY ${LANIAKEA_DEBUG_OUTPUT_DIRECTORY} )
endif()
if ( CMAKE_BUILD_TYPE MATCHES Release )
    set ( CMAKE_RUNTIME_OUTPUT_DIRECTORY  ${LANIAKEA_RELEASE_OUTPUT_DIRECTORY} )
endif()
A cool thing that I didn’t know is that you can set preprocessing variables in CMake using add_compile_definitions command.
# -------- Preprocessor directives --------
if ( CMAKE_BUILD_TYPE MATCHES Debug )
    add_compile_definitions( LANIAKEA_BUILD_DEBUG )
endif()
if ( CMAKE_BUILD_TYPE MATCHES Release )
    add_compile_definitions( LANIAKEA_BUILD_RELEASE )
endif()

IF ( WIN32 )
    add_compile_definitions( LANIAKEA_PLATFORM_WINDOWS )
ENDIF ()
add_compile_definitions( LANIAKEA_BUILD_DLL )
Here I use it to define release/debug definitions and platform definitions. It’s actually very useful. For example, you can put all debug logging logic under some macro like #ifdef LANIAKEA_BUILD_DEBUG and if it’s not set it will be automatically thrown away in the release build so you can save some performance on it.
There is some other stuff with the work directories, link directories, etc, but it’s not really interesting and it all can be found in project github.
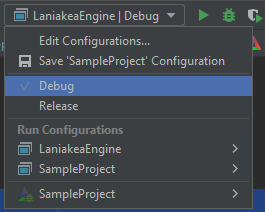
After all, I think I got a nice configuration with 4 simple buttons, using which I can quickly rebuild the game/engine and run it in different configuration modes. No need to copy-paste any libraries from voids of the filesystem. Everything is at hand.
The next stop will I believe will be core systems. I have a skeleton of it. Hope I will share some results during this week.
Thank you for reading, Live long and prosper!
p.s. It was really struggling for me to write this post. I can’t really determine which reader level of topic understanding I am aiming for. I guess time will show :)